43:40.595N 10:16.077E
Muskrat
Chris and Alison
Wed 30 Apr 2025 18:57
29/04/25 Just under two weeks back on Muskie, we have achieved our list of jobs plus the new ones that cropped up on our return. On arriving back we found the macerater for the galley sink had stopped working and a new one was needed (see previous blog). This gave Chris the opportunity to do more tidying up under the sink of the snakes wedding of cables and wires ready for the engine to be removed at the end of this season. He also re wired the bilge pump and the diesel heater. Day two was to remove the old hot water tank and replace it with the new one (see previous blog). This required the engine coolant to be removed and saved ready to be put back with the new tank. With the old tank removed and taken ashore, the new one was lowered down to the aft cabin for fitting. Luckily the new one had exactly the same fittings as the old one so not too much sweating and swearing was heard from the depts of the aft cabin. The old one was inspected to see where the leak had come from and it was found, as suspected, in the casing. The rest of the tank looked very good for its age, so if it had not been for the casing, it would have gone on a lot longer. After a busy two days doing these extra jobs day three was spent doing some of the jobs on the list. Chris had taken home the rotor from the wind generator to repair it. It had been getting increasingly wobbly and noisy over the last year so it needed some TLC. However, due to the fact we were backed up against the overhead power cable (see previous blog) he was unable to try out his repair, but the rotor was offered up and all looked ok. Last year we had some rough weather crossings. We found it quite daunting going out onto the aft deck with Muskie heaving and rolling to turn the gas on, that is located in the aft locker, every time we needed a cup of tea or a meal. It is good practice to turn the gas off at the bottle every time you have finished using it and it is one of the things we do religiously for safety. So Chris decided we needed a valve that would isolate the gas from the bottle in the outside locker but using a switch in the galley. So more palates exercises for Chris as he ran a new cable and fittings from the outside locker to the galley. He managed it, so now we can turn the gas on and off at the bottle from the safety of the galley. There is also a means that we can still, if needed, turn the gas off at the bottle in the outside locker. The annual servicing of the life jackets was carried out by me and a new EPRIB was installed and registered with the coastguard. The old one had an out of date battery. Having won a new one, it seamed sensible to use it. The main sheet track turning blocks had broken cases so these had also been taken home to try to fix. This was done using a 3D printer and some cleaver design programme, we shall see how long they last, but they look and feel very robust. The Danbuoy needed a new light fitting and the metal support that holds it onto the side of the boat had broken and needed re-welding. The light fitting we brought out with us but the welding we had left for the yard owner to organise a repair for us. Unfortunately the welding cost almost as much as a new metal support but at least we didn’t have to order one and pay the cost of postage and customs. This left us with 3 big jobs left to do. The first one we had been talking about for while and really needed to be done despite it being messy and smelly. This involved calibrating the fuel tank and making a fitting in the tank for a dip stick so we could easily measure how much fuel we had. At the end of last year we had tried to run the diesel down as much as possible and managed to get down to 170L of fuel in the tank, still a lot, but now it was time to empty the tank. We had ordered a soft plastic water butt on-line, that would hold 200L. With this set up and plenty of cardboard on the floor to soak up any spillage we set about emptying the fuel into the butt using a drill pump. 170L of fuel successfully emptied into the butt, Chris cleaned the tank and drilled the hole for the dip stick. Then the fun started. We needed to put the fuel back in 10L stages and take a reading with the dip stick so Chris could create a curved graph. After putting back into the tank over 50L of fuel, we realised that the measurement on the side of the water butt and the flow meter we had been using, were not accurate enough to make a sensible graph. So that fuel had to be put back into the butt and the old fashioned way of using a jug was the only option. This completed, Chris was pleased with his graph. All that was needed now was to top up the tank with diesel at the pump, calibrating it at the same time. This was arranged with the marina that we were going to stay in after launching. Polishing of the topsides had not been on the list because I had spent a long time when we got in at the end of the season doing this. Unfortunately some rust staining from the metal protective plate on the gunwale had run down onto the topsides at the bow and had made rather an ugly mess. So armed with fine cutting paste and more polish I set about cleaning this off and re-polishing it. In cleaning up the bow, it made the rest of the boat look grubby after a winter in the yard, so I ended up polishing the rest of boat as well. The last big job was one that we both were not looking forward to in the least. Our water maker needed a new element, a very expensive piece of kit but without it we couldn’t make water out of sea water. We had sourced a new one and it had been on the boat for a while, now was the time to fit it. The instructions look simple…. Remove the old element and replace it with the new one!! As usual this is not as simple as the instructions would make out. Having done this before, and had it go wrong, this was an expensive mistake we couldn’t afford to happen again. Luckily though, with Chris having done the last one, he knew what the pit falls were and was ready this time. Taking a deep breath and being positive it all went well and the new element slid into its casing as well as we could have expected. Now we just need to get out to sea to test it, but we are hopeful this time round. Launch day arrived and finally all the boats in front of us were either moved or launched. We were the last in that day, so we stayed in the water alongside the boat yard for our first night afloat. The next day we motored out into the fast flowing River Arno, gingerly, because it is very shallow, and made our way down stream to deeper water and the Mediterranean again. Our first stop was Marina Di Pisa to get our fuel and finish calibrating the tank. We had booked 2 nights here to enable us to get provisions, do the laundry and get ourselves sorted out. Because the yard only had a small hoist for lifting boats out, we had to take the forestay and the baby stay down in order that Muskie would fit into the hoist. While we are in the marina, we can check the rigging and tension it properly before setting off. Next stop Carrara, to meet the team who are going to take the engine out during the winter.  Muskie blocked in her winter home. 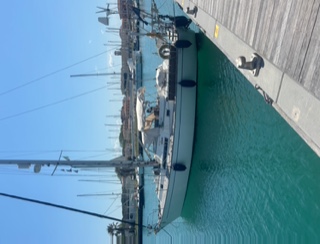 Muskie in Marina Di Pisa after escaping from the boatyard 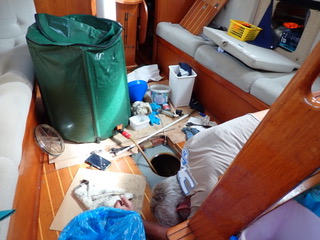 Chris cleaning the fuel tank and calabrating it.  Brilliant idea from the local supermarket - squashed toilet rolls that fit nicely into the cupboard and don’t unravel when at sea! |